Friday, February 19, 2016
Still here...
I have neglected this blog for a while. Never fear, I'm still around searching for those tasty nuggets in a burned dish. Some days are easier than others.


Sunday, June 2, 2013
Searching for the Perfect Lemon Square
About a month ago, I decided to make lemon squares.

I used almond meal (almond flour) for the crust.
I wanted the lemon part to be tangy, not too sweet.
I wanted them totally delicious.
I used fresh lemons.
What I wound up with was very tasty.
We ate them all up.
But the crust wasn't as solid as I would have liked.
Yesterday, I re-worked the recipe.
I came up with this.

I couldn't get the photo quite right,
but the flavor and texture was just what I was looking for.
Yeah, this was just about perfect.
Lemon heaven.....
¾ cup GF flour
(“Ancient Grains” by King Arthur is nice),
¾ tsp xanthan gum, and
¾ cup sugar.
Until the mixture looks like coarse crumbs.
¼ cup rice flour.

I used almond meal (almond flour) for the crust.
I wanted the lemon part to be tangy, not too sweet.
I wanted them totally delicious.
I used fresh lemons.
What I wound up with was very tasty.
We ate them all up.
But the crust wasn't as solid as I would have liked.
Yesterday, I re-worked the recipe.
I came up with this.

I couldn't get the photo quite right,
but the flavor and texture was just what I was looking for.
Yeah, this was just about perfect.
Lemon heaven.....
Lemon Squares
(Makes 16)
Preheat oven to 325.
Grease an 8” square
glass pan.
In a bowl, stir together:
¾
cup almond meal, ¾ cup GF flour
(“Ancient Grains” by King Arthur is nice),
¾ tsp xanthan gum, and
¾ cup sugar.
Then cut in
1
stick of softened butter (1/2 cup), Until the mixture looks like coarse crumbs.
Press
this mixture into the bottom of the prepared pan.
Bake for ~20 minutes,
until golden but not browned. It may
bubble up and look a bit funky. When you
take it out of the oven, let it cool a bit and settle down.
While the crust is
baking, clean up your bowl and beaters.
Juice up 4 large lemons
to get
¾
cup of lemon juice.
Zest some of the lemon
peel to get about
2
Tbs of zest.
When you remove the
crust from the oven, increase the temperature to 350.
Into your clean bowl,
crack open
4
eggs. Whip these up together to get them nice and
frothy.
Combine in a small
bowl:
1
¼ cups sugar, and¼ cup rice flour.
Mix this into your eggs,
being careful to not have lumps.
Use a
hand mixer or a hand blender.
Add in your juice and
zest.
Gently pour your lemon mixture
over the somewhat cooled crust.
Bake for an additional
20-25 minutes, or until set.
Cool and refrigerate
before cutting into 16 squares.
Dust with powdered
sugar.
Sunday, April 7, 2013
Brownies to Go!
Wow! I just took an old recipe that I used to use and converted it to some GF delights. It was very easy and delicious. It made what my friends and I called "Blondies", and we flavored them with almond extract. They were a staple for a little while.
I ran across that old recipe and was also perusing a GF regular brownie recipe. Lo and behold, the proportions were very similar. I did an experiment with "my own thing," making blondies and brownies side-by-side. Although the blondies seem a bit more crumbly than the brownies, they both sliced nicely. Success!!
I wrapped them up individually to send to my gluten free son in Albuquerque.

----------------------------------------------------------------------------------------------------------------------


Update: February 2016 - These are still awesome! I made them for a baby shower and my GF friends loved them. I made enough to send the "blondies" to a friend who can't have chocolate, and they were a hit!
I ran across that old recipe and was also perusing a GF regular brownie recipe. Lo and behold, the proportions were very similar. I did an experiment with "my own thing," making blondies and brownies side-by-side. Although the blondies seem a bit more crumbly than the brownies, they both sliced nicely. Success!!
I wrapped them up individually to send to my gluten free son in Albuquerque.

Gluten Free Brownies -
AWESOME – with changes to make almond “blondies”, too
Preheat
oven to 350.
Grease
an 8 or 9” square glass pan.
Take
½ cup softened butter (one stick)
and
cream it in a mixing bowl with
1 cup sugar.
Beat
in two eggs,
one
at a time.
--------------------------------------------------------------------------------------------------
For
brownies: For almond “blondies”:
Add
1
tsp vanilla extract, Add 1
tsp. almond extract
2/3
cup GF flour blend, 1 cup GF flour blend,
1/3 cup unsweetened cocoa powder,
1
tsp xanthan gum, and 1 tsp xanthan gum, and
1/8
tsp salt. 1/8 tsp salt.
Stir in
6
oz. chocolate chips. No
chocolate chips.
Pour into pan, and Pour into pan, and
smooth with wet fingers. smooth with wet fingers, then
sprinkle
top with
1-2 Tbs sugar and
~ ¼ cup of slivered almonds.
Bake
28-30 minutes.
Cool
in pan.
Cut
into 16 squares.


Update: February 2016 - These are still awesome! I made them for a baby shower and my GF friends loved them. I made enough to send the "blondies" to a friend who can't have chocolate, and they were a hit!
Sunday, March 17, 2013
Irish Soda Bread
.JPG)
Signs of Spring are in my yard!
We had friends over last night for a St. Patrick's Day dinner of Corned Beef and Cabbage (see this page).
One of our friends cannot consume gluten, but that's easy in my house!
For dessert, I made these delicious Almond Cookies (see this page). I doubled the recipe here so that I could mail some to our son in ABQ, but my little food processor couldn't handle it. Note to self: Use a regular stand mixer for doubling the cookie recipe!
.JPG)
I haven't really done a lot of gluten free bread baking, so I wasn't too sure about making my own GF Irish Soda Bread. (I'm pretty sure that other years I have purchased it from my local GF bakery, "Dee's One Smart Cookie.") But this year I tried making it myself, and darn, it was great!
.JPG)
First, I pre-heated the oven to 375.
I took out my 8" cast iron skillet and sprayed it with cooking spray.
I took
1/2 cup of raisins
and poured hot (boiling) water over it, letting it sit for 5-10 minutes or so, then draining them. This plumped up the raisins. I was hoping this would help to make a nice, moist loaf. Considering the good results I had, I won't skip this step next time!
In the stand mixer, I put in the following ingredients, in this order, while the mixer churned at its lowest level:
2 cups of Bob's Red Mill All Purpose Baking Flour,
3 Tbs sugar,
1 tsp baking soda,
1 tsp baking powder,
1 1/2 tsp xanthan gum,
4 Tbs SACO Cultured Buttermilk Blend
(it's a powered buttermilk that you can find in the baking aisle),
1 tsp caraway seeds, and
1 tsp salt.
I added -
4 Tbs softened butter, and let it run until it's blended with the flour mixture, into little pieces.
Then I tossed in -
1 egg,
1 cup water, and
the soaked raisins.
I mixed it up until blended, then plopped the mixture into the prepared skillet.
I smoothed the top with wet fingers, then
cut an "X" into the top, as can be seen above.
I baked this for 45 minutes, turning the oven down to 350 after about 25 minutes.
When I took it out and tested it, I found that an instant-read thermometer clocked it at 190.
The color was pretty dark,
but the loaf had that nice hollow "thump" sound when I rapped on the bottom.
I let it cool on a wire rack.
When I cut it just before dinner, I was delighted to see it looking like this:
.JPG)
My guest loved it so much that I sent a few slices home with her.
Happy St. Patrick's Day,
and
Happy Spring!
Saturday, March 2, 2013
Show your love
Hubby was away for a little business trip. You'd think he was doing the right thing, arranging his flights to take a southern route from the west coast back to New England. However, the weather in Charlotte, NC, turned out to be worse than here. His plane needed de-icing TWICE!

While he was gone, I sent him little texts and emails.
It's nice to have him home again.
Today on Facebook, I was pleased to find that my daughter has been collecting all the things I have been sending her. She lives far away, and I don't trust the delivery of anything of value, so I send cards and whatever might fit inside an envelope. Apparently she has been creating a collage of sorts:

This week, I found the most amazing recipes for gluten free versions of Girl Scout Cookies here.
I immediately noticed the Tagalongs by Betsy, since I had all the ingredients right at home for that one. This morning I got to work as hubby was encased in a metal flying machine on a messy runway. There are many steps, and I didn't finish until mid-afternoon (he was safely home by then), but the results are awesome!


Changes I made: I didn't add milk to the cookie mixture, and I didn't refrigerate this dough. I just divided the dough into 36 pieces and smooshed them into a nice shape with wet fingers onto parchment paper. (I'm amazed at the wonders of parchment paper and wet fingers with gluten free baking!)
Being a pharmacist's wife, I used the end of a pestle (i.e., mortar and pestle) to make indentations in the center of each cookie as it came out of the oven.
Please note: A sandwich baggie is NOT strong enough to pipe the peanut butter filling onto the cookies. (Ask how I know....)
I melted chocolate chips for the topping in a metal bowl set into a saucepan of water. I frosted each cookie with a spatula, instead of dipping. The chocolate didn't seem thin enough for dipping!
Move over, Girl Scouts!!
I'm sending most of these to my son, but we need some here, too!!
How do you show YOUR love?

While he was gone, I sent him little texts and emails.
It's nice to have him home again.
Today on Facebook, I was pleased to find that my daughter has been collecting all the things I have been sending her. She lives far away, and I don't trust the delivery of anything of value, so I send cards and whatever might fit inside an envelope. Apparently she has been creating a collage of sorts:

When you get down to it, it's amazing how much CAN fit in an envelope!
For my son, I like to send him packages of things he can't easily find in a southwestern U.S. college dining hall. Which leaves just about everything, since he must keep gluten free. This week, I found the most amazing recipes for gluten free versions of Girl Scout Cookies here.
I immediately noticed the Tagalongs by Betsy, since I had all the ingredients right at home for that one. This morning I got to work as hubby was encased in a metal flying machine on a messy runway. There are many steps, and I didn't finish until mid-afternoon (he was safely home by then), but the results are awesome!


Changes I made: I didn't add milk to the cookie mixture, and I didn't refrigerate this dough. I just divided the dough into 36 pieces and smooshed them into a nice shape with wet fingers onto parchment paper. (I'm amazed at the wonders of parchment paper and wet fingers with gluten free baking!)
Being a pharmacist's wife, I used the end of a pestle (i.e., mortar and pestle) to make indentations in the center of each cookie as it came out of the oven.
Please note: A sandwich baggie is NOT strong enough to pipe the peanut butter filling onto the cookies. (Ask how I know....)
I melted chocolate chips for the topping in a metal bowl set into a saucepan of water. I frosted each cookie with a spatula, instead of dipping. The chocolate didn't seem thin enough for dipping!
Move over, Girl Scouts!!
I'm sending most of these to my son, but we need some here, too!!
How do you show YOUR love?
Friday, November 9, 2012
Easy Homemade Applesauce
Yes, we had hurricane Sandy here in Connecticut.
Thankfully we never lost power at my house,
but family members did, so we were serving up dinners for a few days.
After hurricane Sandy, we experienced winter storm Ari.
Ari made a slippery mess! It also gave me a delayed opening for work yesterday.
It was so nice and cozy in the house, and I had a little extra time.
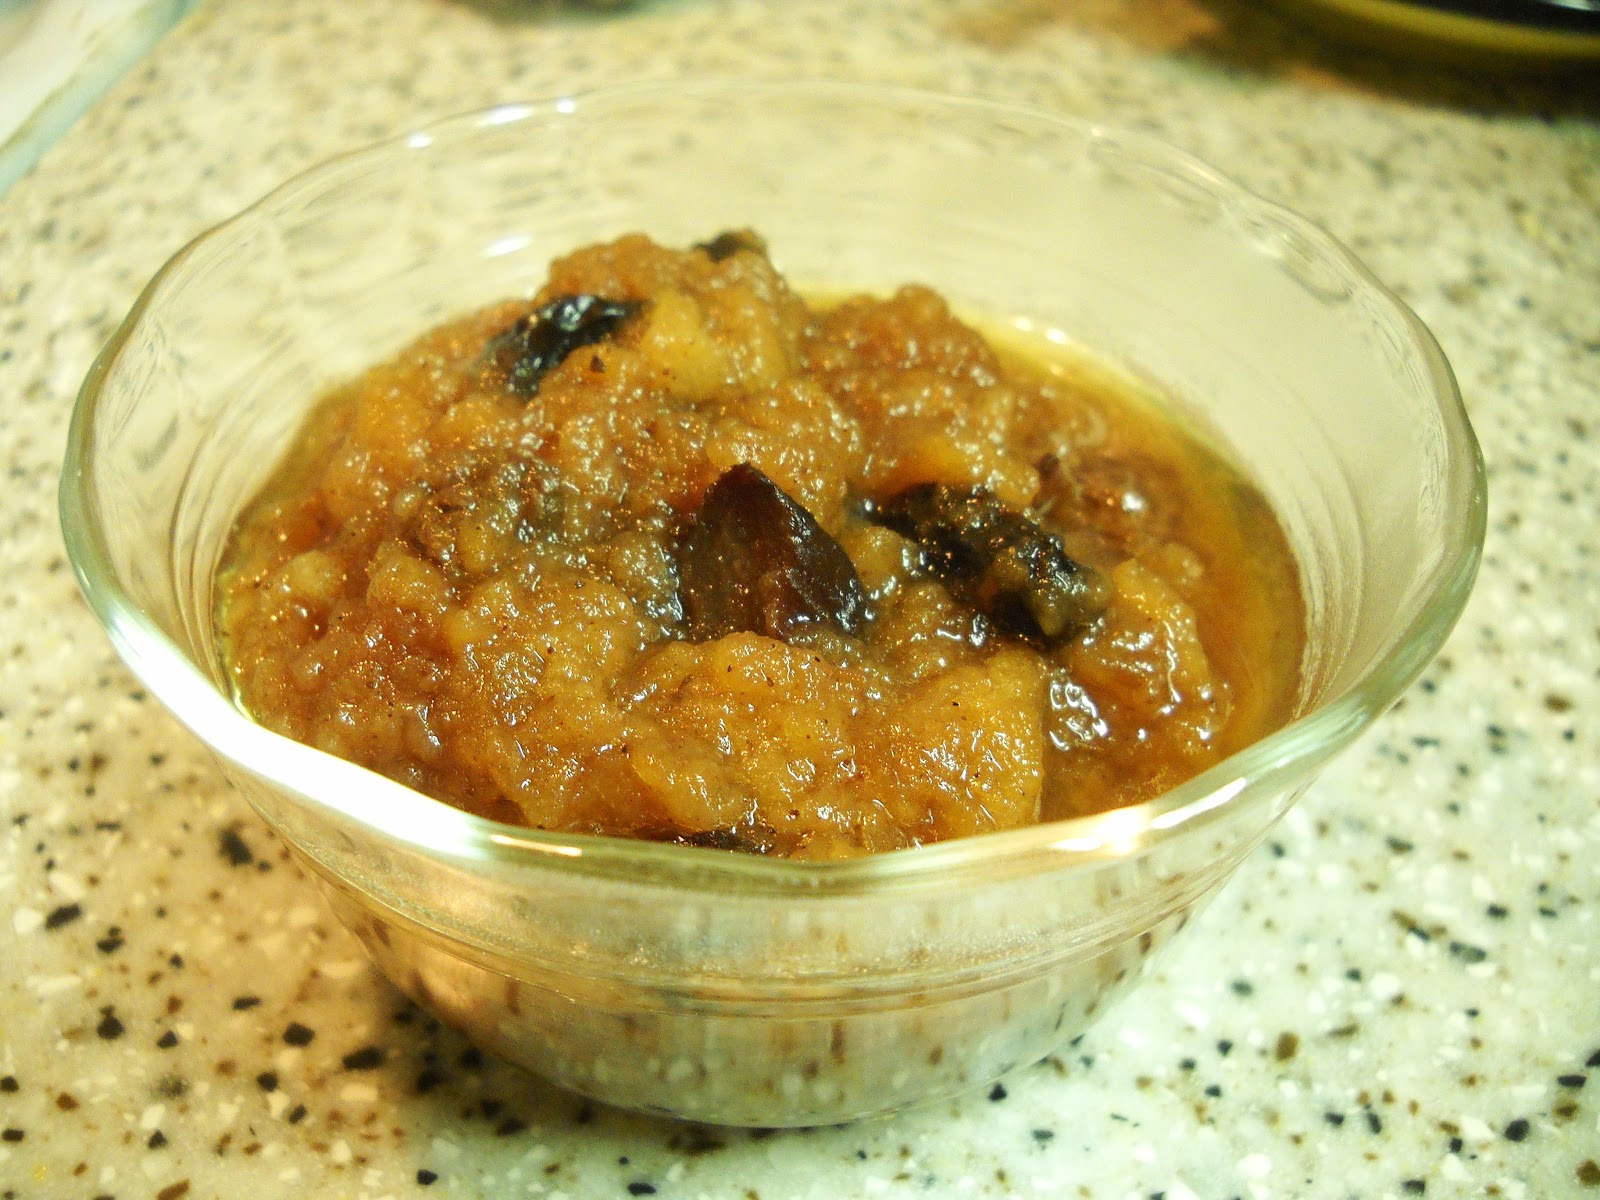
There were four apples rolling around in a drawer of my refrigerator.
I knew nobody was likely to pick up one to munch on at that point,
so I tried something "new." I cut them up and put them in the crock pot!
I layered:
4 large apples, peeled and cut into chunks,
a drizzle of honey,
a sprinkle of cinnamon,
a lighter sprinkle of nutmeg,
a handful of raisins, and
1 Tbs water.
I turned the crock pot to "low" and went off to work.
There was a cold drizzle as I headed there,
and more cold drizzle as I came home.
Yuck.
Once back in my humble abode, however, it was wonderful.
The contrast of my warm kitchen, with the delicious aroma of spiced apples,
to the dreariness outside, was delightful!
Sometimes we need this contrast to appreciate what we have.
Anyway, it was a nice healthy ending to our dinner.
I stirred it up, and divided it into three dessert cups.
Served hot, it tasted spicy and comforting.
Served cold the next morning, it was sweet and addicting!
Next time I think I'll let it cool before serving.
Regardless, it's all gone now.
I'll have to do this again.

Monday, October 8, 2012
Maple Baked Ricotta

The trees in New England are looking great right now!
I love ricotta. It isn't unusual for me to purchase ricotta, forget about using it, then decide I need to use it right away before it expires. I need an EASY recipe for doing this!
The last time I had this problem, about a week ago, I researched and found a recipe for caramelized ricotta pudding. Seemed easy enough. Except that when I went to caramelize the sugar, something went wrong. It didn't get caramel colored, and instead of being a nice gooey mass at the bottom of my custard cups, it was a solid brick of white.
Enough of that.
The ricotta custard itself, however, was quite tasty.
Hmmmm.....why not just bake the ricotta like a custard or pie filling, and leave it at that? If I added a bit of flour, and used the right amount of eggs, it would be nice and firm to cut and serve in squares.
The twist in this recipe comes with using maple syrup as the sweetener. If you don't have real maple syrup, the kind from real maple trees, try substituting honey and call this Honey Baked Ricotta.
I can see this as a dessert, but also a breakfast item, or a snack.

Maple Baked Ricotta
Preheat the oven to 350.
Spray an 8x8" square glass baking pan with GF cooking spray.
Take one 15-oz package of ricotta, and
place it in a mixing bowl with
1/4 cup of REAL maple syrup,
2 Tbs gluten free flour,
3 eggs, and
1 tsp vanilla.
Blend with a hand mixer until nice and smooth.
Pour the mixture into the pan.
Dust it with cinnamon and nutmeg.
Bake 30 minutes.
Cool. Refrigerate.
Cut into 6-9 squares.
Serve drizzled with more maple syrup.
(And maybe some whipped cream, like we used!)

Hubby really loved this.....we each had two helpings!
Subscribe to:
Posts (Atom)