The Hot Handle

A blog interspersed with occasional gluten free recipes.

Please note: If you have a family member who requires a gluten free diet, be sure to use a cast iron skillet that has never previously touched gluten....and if it has, scrub it all down completely and re-season, to be on the safe side.

Looking for information on Celiac Disease? There are many good sites, but here is one to get started with:
www.celiacdisease.net/celiac-disease-101.


Showing posts with label dessert. Show all posts

Sunday, June 2, 2013

Searching for the Perfect Lemon Square

About a month ago, I decided to make lemon squares.


I used almond meal (almond flour) for the crust. 
I wanted the lemon part to be tangy, not too sweet.
I wanted them totally delicious.
I used fresh lemons.

What I wound up with was very tasty.
We ate them all up.
But the crust wasn't as solid as I would have liked.

Yesterday, I re-worked the recipe.
I came up with this. 


I couldn't get the photo quite right,
but the flavor and texture was just what I was looking for.
Yeah, this was just about perfect.

Lemon heaven.....

Lemon Squares                                              
(Makes 16)

Preheat oven to 325.

Grease an 8” square glass pan.

In a bowl, stir together:
¾ cup almond meal,
¾ cup GF flour
   (“Ancient Grains” by King Arthur is nice),
¾ tsp xanthan gum, and
¾ cup sugar. 

Then cut in
1 stick of softened butter (1/2 cup),
Until the mixture looks like coarse crumbs.

Press this mixture into the bottom of the prepared pan.

Bake for ~20 minutes, until golden but not browned.  It may bubble up and look a bit funky.  When you take it out of the oven, let it cool a bit and settle down. 

While the crust is baking, clean up your bowl and beaters. 

Juice up 4 large lemons to get
¾  cup of lemon juice.

Zest some of the lemon peel to get about
2 Tbs of zest.

When you remove the crust from the oven, increase the temperature to 350.

Into your clean bowl, crack open
4 eggs.  Whip these up together to get them nice and frothy. 

Combine in a small bowl: 
1 ¼ cups sugar, and
¼ cup rice flour.

Mix this into your eggs, being careful to not have lumps. 
Use a hand mixer or a hand blender. 

Add in your juice and zest.

Gently pour your lemon mixture over the somewhat cooled crust.

Bake for an additional 20-25 minutes, or until set.

Cool and refrigerate before cutting into 16 squares.

Dust with powdered sugar.  


Sunday, April 7, 2013

Brownies to Go!

Wow!  I just took an old recipe that I used to use and converted it to some GF delights.  It was very easy and delicious.  It made what my friends and I called "Blondies", and we flavored them with almond extract.  They were a staple for a little while. 

I ran across that old recipe and was also perusing a GF regular brownie recipe.  Lo and behold, the proportions were very similar.  I did an experiment with "my own thing," making blondies and brownies side-by-side.  Although the blondies seem a bit more crumbly than the brownies, they both sliced nicely.  Success!! 

I wrapped them up individually to send to my gluten free son in Albuquerque.


Gluten Free Brownies -  AWESOME – with changes to make almond “blondies”, too


Preheat oven to 350.


Grease an 8 or 9” square glass pan.


Take ½ cup softened butter (one stick)

and cream it in a mixing bowl with

1 cup sugar.


Beat in two eggs,

one at a time.
--------------------------------------------------------------------------------------------------
For brownies:                                                                   For almond “blondies”:


Add

1 tsp vanilla extract,                                                      Add  1 tsp. almond extract           

2/3 cup GF flour blend,                                                         1 cup GF flour blend,

1/3 cup unsweetened cocoa powder,

1 tsp xanthan gum, and                                                        1 tsp xanthan gum, and

1/8 tsp salt.                                                                            1/8 tsp salt.


Stir in                                                                                      

6 oz. chocolate chips.                                                    No chocolate chips.


Pour into pan, and                                                            Pour into pan, and

smooth with wet fingers.                                                   smooth with wet fingers, then 

             sprinkle top with
               1-2 Tbs sugar and

~ ¼ cup of slivered almonds.


 ----------------------------------------------------------------------------------------------------------------------


Bake 28-30 minutes.


Cool in pan.


Cut into 16 squares.


Update:  February 2016 - These are still awesome!  I made them for a baby shower and my GF friends loved them.  I made enough to send the "blondies" to a friend who can't have chocolate, and they were a hit! 

Saturday, March 2, 2013

Show your love

Hubby was away for a little business trip.  You'd think he was doing the right thing, arranging his flights to take a southern route from the west coast back to New England.  However, the weather in Charlotte, NC, turned out to be worse than here.  His plane needed de-icing TWICE!


While he was gone, I sent him little texts and emails. 

It's nice to have him home again.

Today on Facebook, I was pleased to find that my daughter has been collecting all the things I have been sending her.  She lives far away, and I don't trust the delivery of anything of value, so I send cards and whatever might fit inside an envelope.  Apparently she has been creating a collage of sorts:

 
When you get down to it, it's amazing how much CAN fit in an envelope!


For my son, I like to send him packages of things he can't easily find in a southwestern U.S. college dining hall.  Which leaves just about everything, since he must keep gluten free. 

This week, I found the most amazing recipes for gluten free versions of Girl Scout Cookies here.

I immediately noticed the Tagalongs by Betsy, since I had all the ingredients right at home for that one.  This morning I got to work as hubby was encased in a metal flying machine on a messy runway.  There are many steps, and I didn't finish until mid-afternoon (he was safely home by then), but the results are awesome!


Changes I made:  I didn't add milk to the cookie mixture, and I didn't refrigerate this dough.  I just divided the dough into 36 pieces and smooshed them into a nice shape with wet fingers onto parchment paper.  (I'm amazed at the wonders of parchment paper and wet fingers with gluten free baking!)

Being a pharmacist's wife, I used the end of a pestle (i.e., mortar and pestle) to make indentations in the center of each cookie as it came out of the oven.

Please note:  A sandwich baggie is NOT strong enough to pipe the peanut butter filling onto the cookies.  (Ask how I know....)

I melted chocolate chips for the topping in a metal bowl set into a saucepan of water.  I frosted each cookie with a spatula, instead of dipping.  The chocolate didn't seem thin enough for dipping!

Move over, Girl Scouts!!

I'm sending most of these to my son, but we need some here, too!!


How do you show YOUR love?


Friday, November 9, 2012

Easy Homemade Applesauce


Yes, we had hurricane Sandy here in Connecticut. 
Thankfully we never lost power at my house,
but family members did, so we were serving up dinners for a few days. 

After hurricane Sandy, we experienced winter storm Ari. 
Ari made a slippery mess!  It also gave me a delayed opening for work yesterday. 
It was so nice and cozy in the house, and I had a little extra time. 
There were four apples rolling around in a drawer of my refrigerator. 
I knew nobody was likely to pick up one to munch on at that point,
so I tried something "new."  I cut them up and put them in the crock pot! 
I layered:

4 large apples, peeled and cut into chunks,
a drizzle of honey,
a sprinkle of cinnamon,
a lighter sprinkle of nutmeg,
a handful of raisins, and
1 Tbs water.

I turned the crock pot to "low" and went off to work.
There was a cold drizzle as I headed there,
and more cold drizzle as I came home.
Yuck.

Once back in my humble abode, however, it was wonderful.
The contrast of my warm kitchen, with the delicious aroma of spiced apples,
to the dreariness outside, was delightful!

Sometimes we need this contrast to appreciate what we have. 

Anyway, it was a nice healthy ending to our dinner. 
I stirred it up, and divided it into three dessert cups. 

Served hot, it tasted spicy and comforting.
Served cold the next morning, it was sweet and addicting!

Next time I think I'll let it cool before serving. 

Regardless, it's all gone now. 

I'll have to do this again.


Monday, October 8, 2012

Maple Baked Ricotta


The trees in New England are looking great right now!

I love ricotta.  It isn't unusual for me to purchase ricotta, forget about using it, then decide I need to use it right away before it expires.  I need an EASY recipe for doing this!

The last time I had this problem, about a week ago, I researched and found a recipe for caramelized ricotta pudding.  Seemed easy enough.  Except that when I went to caramelize the sugar, something went wrong.  It didn't get caramel colored, and instead of being a nice gooey mass at the bottom of my custard cups, it was a solid brick of white. 

Enough of that.

The ricotta custard itself, however, was quite tasty. 

Hmmmm.....why not just bake the ricotta like a custard or pie filling, and leave it at that?  If I added a bit of flour, and used the right amount of eggs, it would be nice and firm to cut and serve in squares. 

The twist in this recipe comes with using maple syrup as the sweetener.  If you don't have real maple syrup, the kind from real maple trees, try substituting honey and call this Honey Baked Ricotta. 

I can see this as a dessert, but also a breakfast item, or a snack.


Maple Baked Ricotta


Preheat the oven to 350.
Spray an 8x8" square glass baking pan with GF cooking spray.

Take one 15-oz package of ricotta, and
place it in a mixing bowl with
1/4 cup of REAL maple syrup,
2 Tbs gluten free flour,
3 eggs, and
1 tsp vanilla.

Blend with a hand mixer until nice and smooth.

Pour the mixture into the pan.

Dust it with cinnamon and nutmeg.

Bake 30 minutes.

Cool.  Refrigerate.

Cut into 6-9 squares.

Serve drizzled with more maple syrup
(And maybe some whipped cream, like we used!)


Hubby really loved this.....we each had two helpings!

Saturday, May 26, 2012

Gluten Free Ricotta Squares!


I have had quite a run of working nonstop.  Last weekend I finally had a chance to look at what has been in my refrigerator.  You know:  The stuff you realize must be used NOW, or never.

I had two pounds of whole milk ricotta, originally intended for some sort of lasagna.
(Ha.)

John and I pulled it out.  It wasn't beyond the sell by date by much. 
We opened it, inspected it, tasted it, and googled it. 

No reason not to use it!

I totally re-worked an old recipe for ricotta squares.  Two cups of wheat flour plus a cup of chopped nuts?  No way - just two cups of almond meal.  Two-thirds of a cup of margarine?  Forget it....1/2 cup of real butter!  A few more adjustments beyond that, and my first recipe didn't look much like the one I created.  Better yet?  It was gluten free.

The look on my family's faces told me I was right on.  Very blog-worthy. 


Gluten Free Ricotta Squares
(Serves 12-16)

Preheat the oven to 350.

Put 2 cups of almond meal/flour into a bowl.
Add 1/2 cup of brown sugar
and 1/2 cup of butter (softened).

Use a pastry blender to make little dinky morsels of butter
mixed in with the dry ingredients.

Press ~3/4 of this mixture into the bottom of a 9 X 13 glass baking dish.
Put it in your preheated oven for 10 min, then let it sit for 5 min.
(Leave the oven on!)

Meanwhile, in another bowl,
mix 2 pounds of whole milk ricotta,
four eggs,
a cup of sugar,
about a teaspoon of lemon extract,
about a teaspoon of grated lemon peel, and
about a teaspoon of vanilla.

(Seriously, I didn't measure the flavorings, I just guesstimated!)

Pour this mixture over the pre-baked (and partially cooled) crust.
Sprinkle the remaining crust mixture over the top of the ricotta stuff.

Pop it all in the oven again.
Bake 35-40 minutes, or until a knife inserted into the ricotta comes out clean.

Let it cool pretty much, then refrigerate.

Cut into squares.
Top each serving with a little whipped cream. 
Observe the faces as your family bites into this!

Now:  Aren't you glad you check my blog?


Saturday, December 24, 2011

Gluten Free Holiday Peppermint Brownies

Merry Christmas!

These are delicious.....


Preparation:

Put out two sticks of butter (1 cup) to soften.

Preheat the oven to 350.

Take out a 9x13 pan.  Spray it with GF cooking spray.


Step One:  The Brownie Layer

Take out your mixer.  Put one stick of the butter (1/2 cup) inside the bowl. 
Run the mixer to cream the butter.
Slowly add:
1 cup of sugar, and
two eggs.

Take two 1-ounce squares of unsweetened baking chocolate.
Put this in the microwave to melt.  It doesn't have to melt all the way. 
Once it looks kind of melt-y, just stir it up with a teaspoon until it's smooth.  

Drizzle this into your butter mixture as the beater runs. 

Stir in:
1 cup of gluten free flour, and
1/2 cup of chopped nuts.

Pour this mixture into the pan.  It will be stiff.
Use wet fingers to smooth it down.
Bake 20 minutes.  Remove and allow to cool.

You can turn off the oven now.
Clean your mixer because you need it for the next step, too!


Step Two:  The Peppermint Layer

In the mixer, place 1/2 stick (4 Tbs) of the butter
Run the mixture to cream the butter again.
Slowly add:
2 cups of confectioner's sugar (a.k.a. powdered sugar),
2 Tbs of water, and
1/2 tsp of peppermint extract.

If you dare, taste this mixture. 
This can be dangerous:  you may not want to stop tasting the mixture! 
(Perhaps you can limit yourself to licking the beaters?)

Put this amazing peppermint concoction into a small bowl and cover it with some plastic wrap. 
Clean up your beaters and mixer bowl. 
By now, your brownies might be cooled.  If not, go have tea and check it out later.

Spread the peppermint concoction onto the cooled brownies.


Step Three:  The Chocolate Drizzle

Melt 2 more 1-ounce squares of unsweetened baking chocolate, as before,
but add 2 tsp of sugar to it.
(Alternately, you can use two 1-ounce squares of semi-sweet baking chocolate without the extra sugar.)
When you go to stir this all up, add 2 Tbs of your softened butter. 
(Yes, you will have 2 Tbs of butter remaining.  Return that to the fridge.) 
Stir this all up and make sure it is of drizzling consistency. 

Drizzle this all over your nice white peppermint top to make a pretty design of your choice. 


Chill in the refrigerator.

Cut in to squares. 


Saturday, August 27, 2011

Off the Handle: A few more desserts and photos

Katie and Andy celebrated their first anniversary last weekend.  We had them and other family members over for dinner and a delicious gluten free cake, using a recipe from the book, The Cake Mix Doctor Bakes Gluten-Free by Anne Byrn.  The cake was an orange cake, filled with lemon curd, and frosted with a cream cheese frosting.  It was fabulous.


Their new miniature schnauzer, Dogmatix, joined the celebration.  He is adorable!


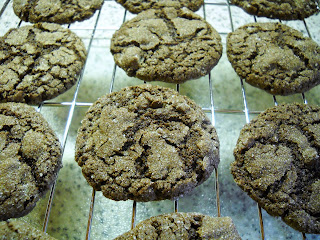
I had also made some cookies for John from yet another cake mix.  This one used a chocolate cake mix that also has cayenne in it, for a spicy touch.  John loves it.  This time I used the cake mix, 1 egg, 1/4 cup of melted butter, 2 Tbs of oil, and 1 tsp of vanilla.   I then added about 3/4 cup of mini chocolate chips.  I rolled them in sugar, as with the cookies of 7/22/2011, and baked them (using parchment paper to line the cookie sheet) for 12 minutes at 350, as before.  I like the way these came out better.  They had more of a cookie-like texture (as opposed to a cake-like texture). 


A day after that, we went to a car show in Granby, CT.  The sunset was beautiful.  Here it is:


Thursday, August 18, 2011

Off the Handle: Peanut Butter Rice Crispie Treats

Yesterday I decided to make Rice Crispie Treats, considering that Kellogg's has come out with a gluten free version of this classic cereal.  Add to that, I came across a bag of Campfire Marshmallows, with the words "gluten-free" clearly marked on the bag.  YaY!

I used to make these all the time when the kids were little.  Easy and delicious!

I had my own way of doing this, substituting peanut butter for margarine or butter. 
(I have a life-long passion for peanut butter.)

Mmmmm.  I was looking forward to this!

I found that old recipe and got started. 

The "giant roaster" marshmallows that I got were just about 1 oz. each. 
Ten marshmallows, add peanut butter, put in microwave, measure cereal.....

Oops!  The marshmallows were flooding all over my microwave!

Luckily I had lots more marshmallows and stuff.  

Cleanup wasn't too bad.  I was actually laughing over it all. 
Here is the REVISED version of how I make my Rice Crispie Treats. 


Peanut Butter Rice Crispie Treats
(makes 24)

Spray a 9 X 13 glass pan with GF cooking spray.

Into a LARGE (12 cup) microwaveable pyrex bowl, measure out:

10 oz gluten free marshmallows, and
1/4 cup smooth peanut butter.

Put this in the microwave, and cook 2 minutes on high,
watching closely that it does not puff up so much that it overflows.

Stir.  Microwave 1/2 to 1 minute more

Dump in 6 cups of Gluten Free Rice Crispies.

Using a rounded knife or a spatula, stir everything together well and quickly.

Press the mixture into the pan, spraying your fingers or the top of the mixture with your cooking spray.  (This keeps it from sticking to you!)

Cut into 24 squares.


Sunday, August 7, 2011

Off the Handle: Ice Cream Crunch Cake

I recently came across a glutenous recipe that I could tell would adapt nicely to a
gluten-free dessert.  I knew it would be perfect for one of the many birthdays
in my family during the month of August.  This was DELICIOUS!


Ice Cream Crunch Cake
(Serves 8-10)

Take a 8 or 9-inch springform pan. 
    (Mine is 8 or 8 1/2", depending on how you measure.)
Line it with foil.
Spray that with a little GF cooking spray.

Measure 4 cups of Gluten Free Rice Crispies into a large bowl.

In a smaller microwave-safe bowl, place
    3/4 cup of GF chocolate chips, and
    3/4 cup of creamy peanut butter.
Microwave 1 minute to 1 minute + 20 seconds.
Stir until chocolate melts and the mixture is smooth.

Add the chocolate-PB mixture to the cereal and carefully combine the two.

Press this cereal mixture onto the bottom and up the sides of your pan.
This is the tricky part.....it gets sticky.  I used wet fingers.
Buttered fingers or fingers sprayed with above cooking spray may work well, too.

Place this into the freezer.
At the same time, remove from your freezer: 
    a half gallon container of the best ice cream you can find,
        in a chocolate chip flavor.
(You won't need all of this for the cake,
but you will need extra for after your cake is gone.)

Wait 10 minutes.  Clean your bowls while you are waiting.

Take the pan out of the freezer and fill the empty space with the ice cream,
using a sturdy spreading spatula.
I placed mine in by piling on thin slices and then spreading them together.

Take 2 Tbs of cocoa powder.
Place this into a small strainer with a fine mesh bottom.
Holding the strainer over the cake, tap it with a spoon.
By moving the strainer around as you do this,
you can create a nice cocoa powder topping to the cake.

Cover the cake with plastic wrap.
Place in freezer for 4 hours.

Remove cake from freezer about 10 min before serving.
Remove from springform pan and wrappings.
Place it nicely on a pretty plate.

Cut into slices!


Friday, July 22, 2011

Off the Handle: Cake Mix Cookies


Hubby actually moved his hot rod today! 
He took it out of the garage and turned it around. 
A big step to road-readiness!
Congrats, Peter!  :)

Last weekend I made cookies from a Betty Crocker gluten free cake mix. 
The recipe is found here.

It is super easy.

I used vanilla cake mix instead of chocolate.  I added about 1/2 cup of chocolate chips and 1/2 cup of slivered almonds.  As always, I used parchment paper to bake them on.  My technique made two dozen cookies instead of the four listed on the recipe....I guess I made them "big."  I baked them for 12 minutes. 

They were very tasty, but next time I will add more chocolate chips. 

They didn't brown, however, so I can see why the original recipe is with the devil's food cake mix.  Regardless, it was a quick and easy way to make a GF treat!

Thursday, July 7, 2011

Off the Handle: Dessert Pizza

While visiting Old Sturbridge Village on July 4th, we watched as the sheep were moved from one place to another.  They ran across the common for this.  Hubby quickly dubbed this, "The Running of the Sheep," as if it was Old Sturbridge Village's version of the running of the bulls in Pamplona, Spain.


We thought that was pretty funny!

The night before we had nine people at the house for dinner, and two more joined us for dessert time.  I was inspired by this recipe from glutenfreely.com.  (That's a link you can click on to see, by the way....)

I didn't have Betty Crocker Brownie Mix, although I think it is very good.  I used one 16-oz package of Pamela's Chocolate Brownie Mix instead, prepared roughly according to package directions.  (I always take steps to reduce the fat somewhat if possible, so I used 1/4 cup of oil and 4 oz. of pureed fruit instead of 1/2 cup of oil and the water it called for....)  I spread this onto a pizza pan, previously sprayed with cooking spray.  I smoothed it out nicely into a 12" circle with wet fingers. 

I baked this brownie crust at 350 for about 19 minutes.  I let it cool completely in the pizza pan.

I mixed one 8-oz package of Neufchâtel cheese (the "light" cream cheese) with the 1/3 cup of sugar and some vanilla.  I put this aside in the refrigerator.  I also pitted and sliced in half exactly 30 cherries, enough for five cherry halves per pizza slice.  I wanted red on top due to Independence Day weekend.  I think most any fruit would be good on this, however. 

Just before serving, I spread the cheese mixture on the brownie crust, cut it into 12 slices, and decorated each slice with the fruit.  It looked really nice and tasted great. 


Monday, July 4, 2011

Off the Handle: More Pizzelle

Happy Independence Day!

We were at Old Sturbridge Village today, and they had two new calves at the Freeman Farm.  One was pretty frisky, and it apparently wanted to get the other to play.  Here is its picture:


For the two weekend gatherings that we hosted, I decided to make pizzelle again.  I looked over my boxes of gluten free cake mixes and decided to use a 15-oz package of Betty Crocker Gluten Free yellow cake mix for a version of my cake mix pizzelle recipe of April 23, 2011.  Here's what I did:

I heated up my dedicated gluten free pizzelle baker.

I melted 1/2 cup (1 stick) of butter in the microwave for 30 seconds.

I used a wire whisk to smooth out the melted butter.

I added 3 eggs,
about 1 tsp of vanilla, and
about 1/2 tsp of anise extract, and
the cake mix.

I didn't need to add any water as the dough was not as thick as I am accustomed to for pizzelle.

I baked each pair of pizzelle for 33 seconds (using a digital timer) with about 1 Tbs glops of dough, possibly less.  This recipe makes 32-36 pizzelle.

The pizzelle came out a little thinner than usual.  John liked them the best of all my pizzelle!

I dust them with powdered sugar before serving. 

Always yummy!  No gluten necessary for good pizzelle....


Saturday, June 25, 2011

Off the Handle: Italian Almond Cookies


You know those great platters of Italian cookies that people buy for parties?  I usually dig down and take only the almond macaroon style....they have the most amazing almond flavor, and a melt-in-your-mouth texture.  Sometimes they are rolled in pignoli nuts, sometimes they are topped with a whole almond.  However they are dressed, I find them!

If you need to be gluten free, those platters are off-limits due to the risk of contamination.  It's from a standard bakery, after all.... you have to guess they probably make them with floured hands, even if there is no flour in the recipe.  They are also piled onto a tray with all the other cookies....

Enter The Hot Handle to ensure the ability of gluten free individuals (a.k.a. my DS) to partake in this delicious treat.  I also discovered they are EASY.  YaY!

Recipe should easily double if you'd like!

Italian Almond Cookies

Preheat the oven to 350.

Open an 8-oz can of almond paste and put that in the food processor.
Add 1/2 cup of sugar.
Combine until crumbly in texture.

Add 1 egg white and 1/2 to 1 tsp of vanilla.
Process again until smooth.
It will be kind of sticky and wet.

Spoon this mixture into 16 lumps onto a cookie sheet lined with parchment paper.
Using wet fingers, smooth these lumps into nice round lumps.

Decorate with 3-4 slivered almonds on each lump.

Bake 20 minutes, until golden brown.
Let cool on parchment paper.
Remove from parchment.  Hide them until serving time.

Tuesday, June 21, 2011

Amazing Flourless Chocolate Cake

For Father's Day, I made an amazing flourless chocolate cake that is actually fairly healthy.  What a find! The "surprise ingredient" would have astounded family members if I had told them about it.  Everyone enjoyed it.

I stumbled upon this recipe on allrecipes.com:

http://allrecipes.com/recipe/garbanzo-bean-chocolate-cake-gluten-free/detail.aspx

Of course, I made changes.  In direction #1 it says to "grease and flour a 9-inch cake pan."  Well, only use flour if it's the gluten free variety.  I didn't bother; I just used cooking spray.  I used an 8-inch glass pan instead of a 9-inch pan.  It worked out fine.

I didn't invert the cake onto a cake pan.  Instead, I just let it cool in the pan.  When it was cool, I sprinkled it with confectioners' sugar and toted it over to my brother's Father's Day cookout. 

The first piece out of the pan crumbled apart.....so I took that one. :)

The texture of the slices at that time was somewhat cake-like, but not dry. 
I served them with low-fat vanilla ice cream on the side.

The next day, after a night in the refrigerator, the one remaining slice was happily consumed by John.  He reported that it was more like fudge by then. 
He appeared to like them both.

Two possible textures....in one delicious cake!

I can't believe I forgot to take a photo!

I will DEFINITELY make this cake again!

Saturday, June 4, 2011

Apple Skillet Cake

Yesterday was my birthday.  I needed a cake to tote over to my parents' house in the evening. 

Not long ago, I purchased this book, "The Cake Mix Doctor Bakes Gluten-Free" by Anne Byrn.  I have some of her previous books, which I don't anticipate using much any more since all the recipes contain gluten.  I was very excited to see this one!


On page 167 is her "Fresh Apple and Pear Skillet Cake."  I used this cake mix by Cherrybrook Kitchen:


I made modifications, of course.  Instead of 6 Tbs of butter, I used 4 Tbs of butter plus 2 Tbs of canola oil.  I used strictly butter in the apple mixture which comes out on top after you flip it over onto a plate, and the leftover two plus two of oil in the cake mix.  I also used two apples instead of an apple and a pear.  I omitted the instant pudding mix, and added about 1/4 tsp of nutmeg.  (Of course ... Connecticut is "The Nutmeg State!)

Here's how it looked when it came out of the oven.


At that time, I looked at the directions, which I should have done more carefully to begin with, and it said,

      "Serve the cake warm."

Impossible.  I wasn't heading to my parents' house for another four hours!

I waited the five minutes, ran a knife around the edge of my 10-inch cast iron skillet, and flipped it over onto a cake plate.  The plate had one of those dome-like covers.  That worked out well to store it after it had cooled. 

Being cooled, the cake was FINE.  It tasted delicious with a dollop of whipped cream!  My parents liked it with a spoonful of vanilla frozen yogurt on the side. 

In any case, it was an excellent birthday dessert.  I would like to try this with other fruits!


Saturday, April 23, 2011

Chocolate (Cake Mix) Pizzelle


With Easter being tomorrow, I wanted to make a dessert that everyone at my brother's house will enjoy. 

I planned to make pizzelle, and roll some up to make cannoli.  I anticipate that everyone will be surprised at how good they are.  My gluten free pizzelle/cannoli recipe was posted on January 22, 2011.

I had a box of cake mix that I wanted to use for something.  It's called "Gluten Free Dreams," and the package looks like this:


Here is how I made my cake mix pizzelle:

Cake Mix Pizzelle
(Makes ~30)

Melt 1/2 cup (1 stick) of butter in the microwave. 
(I did this for 30 seconds.  It doesn't have to be completely melted.....
you don't want to cook the eggs in the next step!)

Use a wire whisk to smooth out the melted butter. 

Add 3 eggs and whisk it up. 

Add one 16.4-oz package of Gluten Free Dreams Cake mix.
(This was about 2 1/4 cups.)

I needed to add 1-2 Tbs of water to make a soft dough.

Heat up your pizzelle baker.
Bake 33-35 seconds.  I have a digital timer that works well for this.

Sprinkle with powdered sugar before serving.


While I was at it, I made cannoli with my standard recipe. 
Here is a picture of how they look:


I made these by wrapping the newly-baked (soft) pizzelle around these cannoli forms:


As the pizzelle cool, they harden around the forms. 
It didn't take any longer than waiting for the next batch to cook. 

Tomorrow I will fill them just prior to serving.

I look forward to Easter dessert!!!

Friday, March 18, 2011

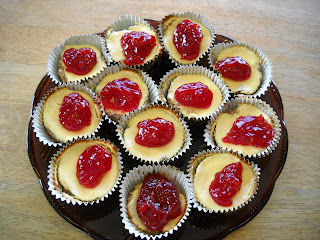
Off the Handle: Mini Cherry Cheese Charmers


My crocuses are blooming!  Spring is here!

I love the first crocuses of Spring.  I have been known to be jumping up and down while admiring them.  I love the way I can plant the bulbs in the Fall, and in early Spring they come up all by themselves, as if by magic (unless the moles eat them first).  When I see them, I know warmer days are a certainty.

These mini cheese tarts look almost as pretty as crocuses. 
My family loved the nut crust!

Mini Cherry Cheese Charmers
(Makes 12)

Preheat the oven to 375.

Put muffin papers into 12 muffin cups.

Mix 1 cup of hazelnuts (or other treasured nuts)
with 2 Tbs melted butter, and
3 Tbs sugar
in a food processor. 
Stop when the nuts are looking like coarse sand.
(You don't want to make nut butter!!!)

Divide this mixture into your papered cups.  Using wet fingers, press the mixture into the bottom and a little up the sides of each cup.

Take an 8-oz. pkg. of cream cheese, and
blend it with one egg,
1 tsp. vanilla, and
1/4 cup sugar.
(I used a hand mixer.)

Divide this mixture into your papered cups, on top of the nut crust. 
Use wet fingers to smooth the tops evenly.

Bake 14 minutes.

Cool.

Place a tablespoon of Solo Cherry Cake and Pastry Filling on top of each.

Refrigerate and serve cold. 


Tuesday, March 15, 2011

Off the Handle: Cherry Pie!

My first crocus of Spring 2011!

I have been working hard at developing a cherry pie with a pie crust that will please everyone, and that does not contain corn.  This has been a challenge.  I tried two pies, some tarts, and little cherry cheesecakes in the process.  (The little cheesecakes were good!  Will post them soon....)

This is what I ended up with.  Very good!

GF & Corn Free Cherry Pie

For the crust:

Turn on your oven to 400.

Take 1 1/2 cups of gluten free baking mix (I used Pamela's), and
6 Tbs of butter
(I happened to use 4 Tbs butter and 2 Tbs of Earth Balance Margarine...total of 6 Tbs.)

Use a pastry blender to get the butter into little crumbs distributed throughout the mixture.

Add about 1/4 cup (4 Tbs) cold water. 

Mix it into a ball.

Grease a 9-inch pie pan. 
(I used regular cooking spray.  Don't use the "baker's" type of spray if you want to be gluten free!)

Press 2/3 of your dough into the pan to make a crust. 
Use wet fingers!

Bake 8 minutes.

Press the other 1/3 of the crust onto a plate. 
Cut it into tiny squares to use later.

Make your filling:

Combine in a 2-qt. saucepan:
2 14.5-oz. cans tart cherries,
1 cup of sugar, and
1/4 cup of quick tapioca, slightly rounded.

Cook and stir occasionally, bringing the mixture to a full boil.
Turn off your heat.
Add 1 tsp. almond extract.

Pour your hot mixture into the hot pie crust. 
I had too much filling, so I put some into a smaller ovenproof container to bake alongside the pie.

Top the pie with the little pie crust bits, arranging them artistically.
You can sprinkle it with a little sugar at this point.  (I didn't.)

I kept the oven at 400, but next time I think I should turn it down at this point to 375.

Put your pie on a cookie sheet or special sheet to cook pies on. 
If this spills over, you don't want all the smoke detectors in your house to start blaring!

Bake about 20 min., or until it's browned and bubbly.

Let cool.


Friday, February 25, 2011

Off the Handle: Graham Cracker Chocolate Chip Bar Cookies


This is a little counted cross stitch piece that a client of mine made for me when I was a grad student.  She was an elderly lady.  I was honored that she took the time to make this and give it to me.  It has been hanging in my kitchen ever since I got married and moved in.

I'm sure she would be happy to know I have treasured it so much.

Too bad the food we create gets eaten and you can't look at it 30 years later.  I guess that's where photos, blogs, and memories come in handy. 

These cookies, however, were really quick to put together.  Not like counted cross stitch!!

Graham Cracker Chocolate Chip Bar Cookies
(Makes 18)

Preheat your oven to 350.

Grease a 8x8 square baking pan. 

In a mixing bowl, combine:

One 10.5-oz box of Kinnikinnick gluten free graham style crumbs
          (about 2 1/4 cups),
1 cup (or a little more) gf chocolate chips,
1 tsp. baking powder, and
1/2 cup chopped nuts (optional). 

I had hazelnuts handy, for some reason. 
(I store nuts in my freezer, fyi.)

After the dry stuff is mixed together, add:

1 14-oz can of sweetened condensed milk, and
1 tsp vanilla.

I had to use my [clean] hands to mix it a little toward the end. 
The mixture is extremely thick!
Put the mixture in your pan, using wet fingers to smooth it down.

Bake 30-35 minutes.  A toothpick inserted near the center should come out clean.
Let cool *completely* before cutting.

This is nice alongside a scoop of vanilla ice cream. 
I also liked it drizzled with a little bit of that chocolate sauce from the last post.

Just plain is good, too!