The Hot Handle

A blog interspersed with occasional gluten free recipes.

Please note: If you have a family member who requires a gluten free diet, be sure to use a cast iron skillet that has never previously touched gluten....and if it has, scrub it all down completely and re-season, to be on the safe side.

Looking for information on Celiac Disease? There are many good sites, but here is one to get started with:
www.celiacdisease.net/celiac-disease-101.


Tuesday, June 28, 2011

Getting a Handle On: GF Pizza :)

At this point I have had a good amount of experience making gluten free pizza.  I hate to disappoint the reader by saying that I use a mix, but it's the truth.  It works.....'nuff said.

We tried a few brands and like the King Arthur Pizza Crust Mix the best:


I pretty much follow the directions on the box, with these exceptions:


In Step 1, I use 2 Tbs oil plus 2 Tbs additional water instead of 4 Tbs of oil.

Aso in Step 1, it's nice when I remember to add some Italian herbs.


In Step 4, I use cooking spray on the baking sheet/pizza pan.  I form a little more than half of the dough onto a standard 16" round pizza pan, plus a second on a baking sheet.  The dimensions on that one aren't crucial, but I guess it is about 12-14" in diameter.

Regarding pans:  My pizza pans for glutenous pizzas have holes, but I would never try those for GF pizza.  The GF dough is very soft.....which leads me to my other important tip....

It's very important to use WET FINGERS to smooth the crust on the pizza pan or other baking sheet.  I keep my 2-cup measuring cup nearby, with warm tap water inside, to frequently dip my fingers.  (Gluten free dough is nothing like glutenous dough!!!) 


After smoothing the crusts with wet fingers, I spray them briefly with cooking spray, then just let them rise uncovered.


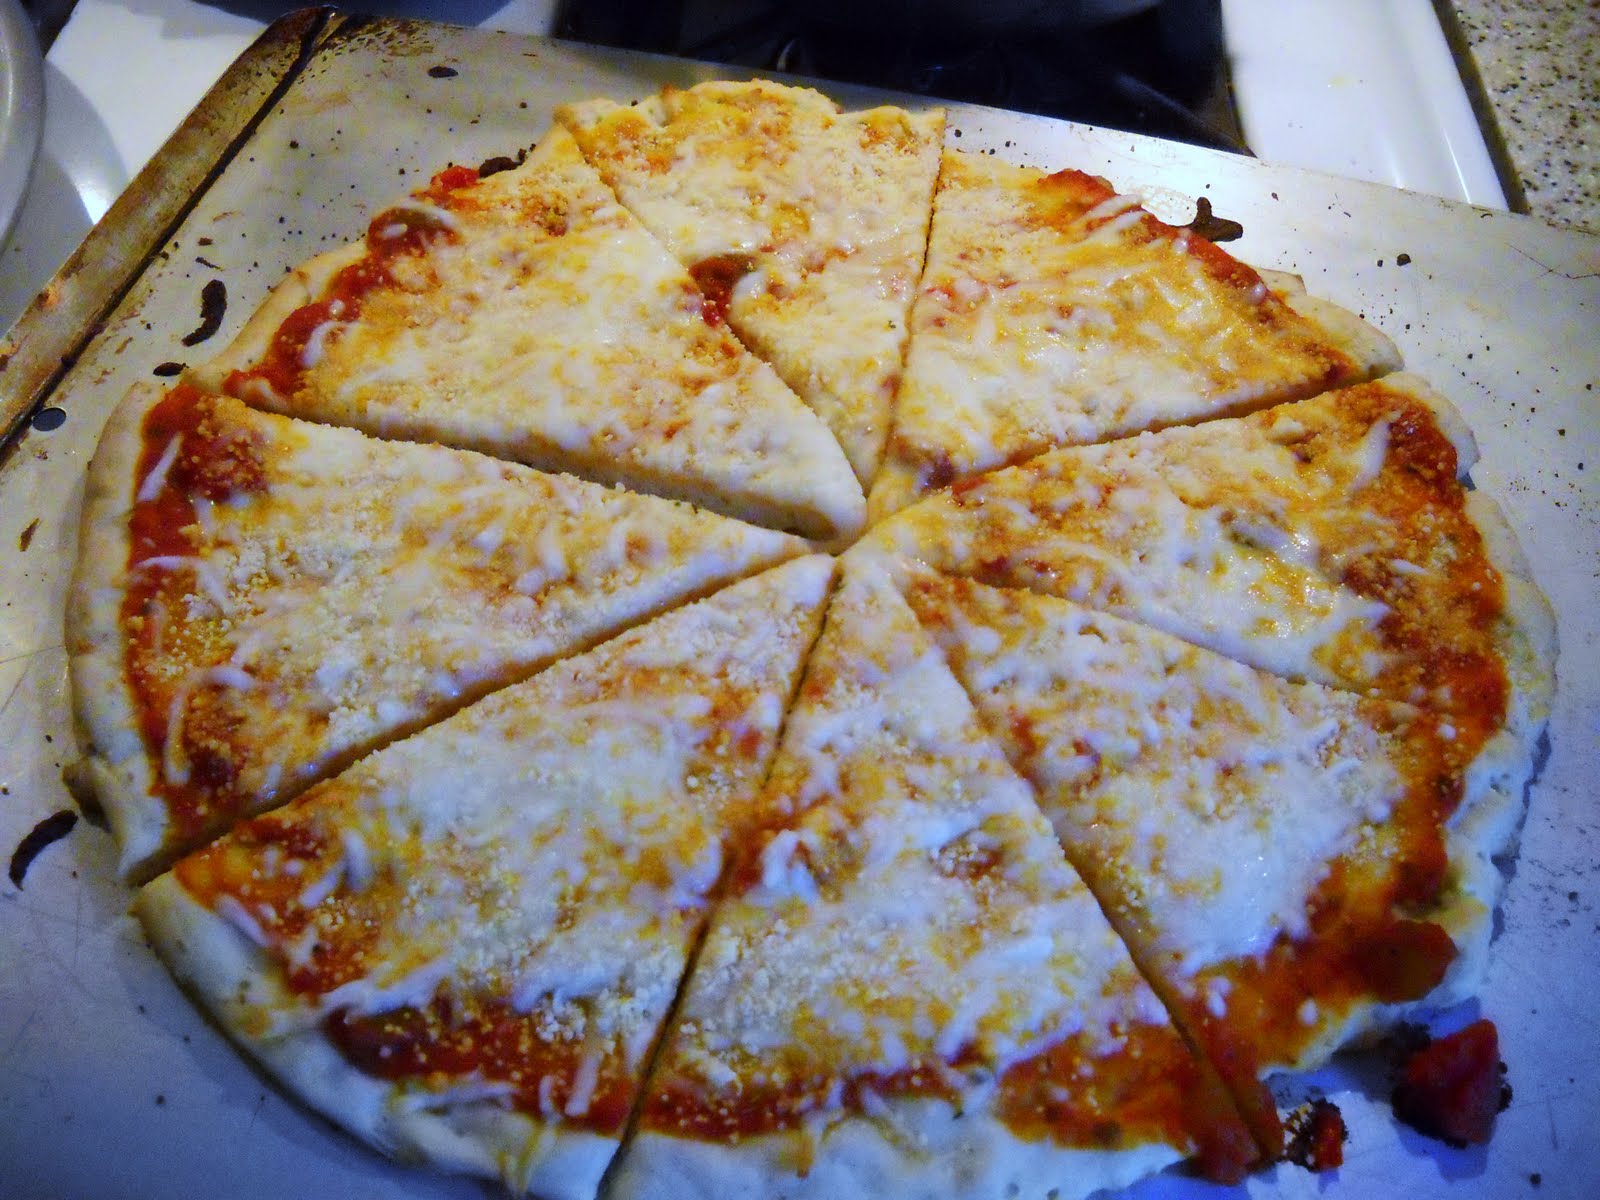
I bake the crusts for 10 minutes or so at 400 degrees in Step 5, then remove from the oven as directed and top in this way:  One pizza, usually the smaller one, gets a few dollops of jarred tomato pasta sauce, about half of an 8-oz bag of shredded mozzarella, and a sprinkling of parmesan.  The second pizza, usually the larger one, becomes the "white" pizza, which is nice because it seems to keep a tad better for leftovers.  Everyone loves the garlicky flavor.  Here's what I do.....

I pour a dollop of olive oil on the crust, smoothing it with the back of a spoon, then sprinkle it with garlic powder and Italian herbs.  On top of that, I sprinkle the other half of the shredded mozzarella, and the parmesan. 

I find that the parmesan really helps to give my pizzas a "pizza flavor!" 

Usually I pop them into the oven for the second baking at 8 minutes, 

Here's how they look:


This is actually enough for five of us, with three of us being light eaters (meaning about two slices each).....plus leftovers for John the next day.


Saturday, June 25, 2011

Off the Handle: Italian Almond Cookies


You know those great platters of Italian cookies that people buy for parties?  I usually dig down and take only the almond macaroon style....they have the most amazing almond flavor, and a melt-in-your-mouth texture.  Sometimes they are rolled in pignoli nuts, sometimes they are topped with a whole almond.  However they are dressed, I find them!

If you need to be gluten free, those platters are off-limits due to the risk of contamination.  It's from a standard bakery, after all.... you have to guess they probably make them with floured hands, even if there is no flour in the recipe.  They are also piled onto a tray with all the other cookies....

Enter The Hot Handle to ensure the ability of gluten free individuals (a.k.a. my DS) to partake in this delicious treat.  I also discovered they are EASY.  YaY!

Recipe should easily double if you'd like!

Italian Almond Cookies

Preheat the oven to 350.

Open an 8-oz can of almond paste and put that in the food processor.
Add 1/2 cup of sugar.
Combine until crumbly in texture.

Add 1 egg white and 1/2 to 1 tsp of vanilla.
Process again until smooth.
It will be kind of sticky and wet.

Spoon this mixture into 16 lumps onto a cookie sheet lined with parchment paper.
Using wet fingers, smooth these lumps into nice round lumps.

Decorate with 3-4 slivered almonds on each lump.

Bake 20 minutes, until golden brown.
Let cool on parchment paper.
Remove from parchment.  Hide them until serving time.

Tuesday, June 21, 2011

Amazing Flourless Chocolate Cake

For Father's Day, I made an amazing flourless chocolate cake that is actually fairly healthy.  What a find! The "surprise ingredient" would have astounded family members if I had told them about it.  Everyone enjoyed it.

I stumbled upon this recipe on allrecipes.com:

http://allrecipes.com/recipe/garbanzo-bean-chocolate-cake-gluten-free/detail.aspx

Of course, I made changes.  In direction #1 it says to "grease and flour a 9-inch cake pan."  Well, only use flour if it's the gluten free variety.  I didn't bother; I just used cooking spray.  I used an 8-inch glass pan instead of a 9-inch pan.  It worked out fine.

I didn't invert the cake onto a cake pan.  Instead, I just let it cool in the pan.  When it was cool, I sprinkled it with confectioners' sugar and toted it over to my brother's Father's Day cookout. 

The first piece out of the pan crumbled apart.....so I took that one. :)

The texture of the slices at that time was somewhat cake-like, but not dry. 
I served them with low-fat vanilla ice cream on the side.

The next day, after a night in the refrigerator, the one remaining slice was happily consumed by John.  He reported that it was more like fudge by then. 
He appeared to like them both.

Two possible textures....in one delicious cake!

I can't believe I forgot to take a photo!

I will DEFINITELY make this cake again!

Saturday, June 18, 2011

Egyptian Walking Onions


These are "Egyptian Walking Onions."  We learned about them at Old Sturbridge Village.  They have an onion flavor, and the entire plant is edible.

The reason they are called "Walking Onions" is that the bulbs at the end of the stalks eventually get heavy, and the stalk bends over as the bulb touches the ground.  At this point, a new plant will grow.  They can walk right across your garden that way!

Yesterday I made pesto (see post of 7-10-2010), as you might guess from the cropped basil in the background of the photo.  I also had a few leftover bell peppers.  As a side dish, I decided to cook up the peppers in my 8" cast iron skillet with some olive oil.  I added two stalks of the Egyptian Walking Onions, cut like scallions.  I also added a spoonful of that all-purpose "Wow" seasoning that we like.  In the photo below, you can see that the fork is pointing at one of the cut-up walking onion stalk bits.


The "Notta Pasta" rice fettuccini is a good pairing with the pesto.  Once it was cooked, I was careful to rinse it with hot water that I heated on the stove as I cooked the pasta.  Too much mixing doesn't work here (it gets gummy!) ..... so I gently mixed my pesto without the cheese into the pasta, and we generously added parmesan on top, at our individual plates.


After this dinner, John was meeting friends at a restaurant where he did not feel comfortable about it being gluten free....it was an Italian restaurant with lots of opportunity for cross-contamination.  He went ahead to meet his friends, simple joining them with a beverage, feeling comfortably full from our home-cooked meal. 

Saturday, June 4, 2011

Apple Skillet Cake

Yesterday was my birthday.  I needed a cake to tote over to my parents' house in the evening. 

Not long ago, I purchased this book, "The Cake Mix Doctor Bakes Gluten-Free" by Anne Byrn.  I have some of her previous books, which I don't anticipate using much any more since all the recipes contain gluten.  I was very excited to see this one!


On page 167 is her "Fresh Apple and Pear Skillet Cake."  I used this cake mix by Cherrybrook Kitchen:


I made modifications, of course.  Instead of 6 Tbs of butter, I used 4 Tbs of butter plus 2 Tbs of canola oil.  I used strictly butter in the apple mixture which comes out on top after you flip it over onto a plate, and the leftover two plus two of oil in the cake mix.  I also used two apples instead of an apple and a pear.  I omitted the instant pudding mix, and added about 1/4 tsp of nutmeg.  (Of course ... Connecticut is "The Nutmeg State!)

Here's how it looked when it came out of the oven.


At that time, I looked at the directions, which I should have done more carefully to begin with, and it said,

      "Serve the cake warm."

Impossible.  I wasn't heading to my parents' house for another four hours!

I waited the five minutes, ran a knife around the edge of my 10-inch cast iron skillet, and flipped it over onto a cake plate.  The plate had one of those dome-like covers.  That worked out well to store it after it had cooled. 

Being cooled, the cake was FINE.  It tasted delicious with a dollop of whipped cream!  My parents liked it with a spoonful of vanilla frozen yogurt on the side. 

In any case, it was an excellent birthday dessert.  I would like to try this with other fruits!